Reed Replacement Fail

Kinya
I've watched your video series on reed replacement on this site. It's excellent, thank you. I've attempted about five reed replacements now (always the 5 draw. I don't know what I've got against that reed!) and only two of the five attempts have been successful. These have been on Hohner Crossovers and Special 20s. The failures sound like a kazoo. Like Saran wrap around a comb.
Things seem to go wrong in preparation of the new reed. When I drill the hole with the clearance drill it seems I need a lot of torque to get the drill to pass through. This causes the reed to bend and possibly deform under the thumb I'm holding it down with.
I'm using new replacement reeds directly from Hohner.
Also when drilling this hole, despite the fact that the reed comes with a pilot hole for the rivet built in, somehow the enlarged hole I make for the screw comes out off center. Thus the reed does not sit in the slot properly.
Any advice for me? Should I switch to rivets? This is causing me to go down that dark road of throwing out a $70 instrument due to a $2 part ;( thank you.

Hello Paul, we never use the F word (fail), but rather, we look at those past experiences as the "tuition" you had paid towards your education. An education that will save you bundles of cash over the next few years!
Don’t feel bad about draw reed 5. Between you and me, I replace more of those reeds from Andy Just’s Manji harmonicas than any other reed--shhh. I have a theory about this ...
THEORY
As blues players, we tend to hunt for a (bendable) note on the 5 hole, where none exists (a quarter tone is all you will find). On the 5 hole, there is only one half-step that separates the top reed pitch and the lower reed pitch. For example, on your C harmonica, that would be E on the blow and F on the draw. With normal “bending” skills, conjuring up missing notes on the diatonic harmonica can only be possible if a whole step (or more) exists in the same hole. For example, hole 4 has a C reed on the blow and a D reed on the draw. Chromatically, we bridge the gap between C-D by inserting a Db. [C-Db-D]. The only bendable note available on the 4 draw breath is Db.
My first Harp Tech mentor was Rick Epping, formerly of Hohner USA. The most important take-a-way that he had taught me was that a great playing harmonica was built on top of many details that were executed well.
This weekend I will take close up pic-shots of the various reed replacement processes, then annotate/post them on this forum site for you and the readers. The visual clarity will make things all better ;o)
Your Harpsmith, Kinya
Hello Paul, here are the tutorial photos I had promised you and the readers:
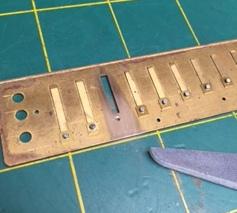
REED PLATE
Punch out rivet to remove reed
The Richard Sleigh reed tool has a convenient relief chute to prevent spent rivets from clogging the inside of the anvil part of the reed tool.
Notice the raised divot left behind from punching out the old rivet. Your goal is to eliminate all irregularities, so that the new reed pad can lay on an absolutely flat surface. *NOT SHOWN, but completed: The process of creating a pilot (tap) hole and tapping the threads into the reed plate.
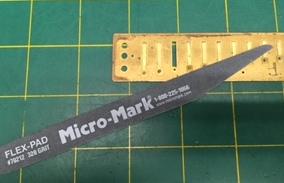
Micro-Mark Flex Pad 320grit will do the trick!
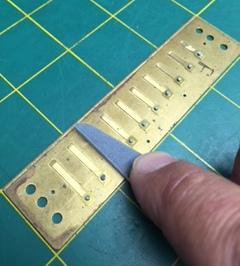
The Flex Pad fits perfectly in between the reeds. Apply downward even pressure, then stroke the pad forward and back.
Magically the raised divot has been flattened to the level of the reed plate.
Another proven strategy is to use the flat side of the RS Reed Punch

Gently tap the flat punch to flatten the divot.
REED PAD

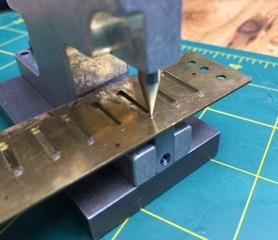
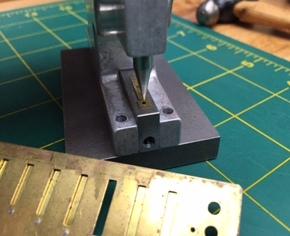
With your thumb, press the reed up against a scrap piece of wood (pine, oak, etc.). This will keep the drill bit from wobbling (read: distorting the reed pad). Once the reed is secured, use your pin vise with the appropriate size clearance drill to make the hole for your chosen machine screw. I recommend drilling past the reed and into the wood a fraction or two—to help clear out the brass shavings. The HARPSMITH recommends 0-80 size machine screws, with a #52 clearance drill bit. The pilot hole for the 0-80 tap will require a #54 (tap) drill bit.

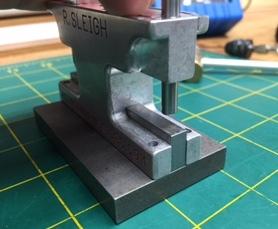
This crazy tool (Micro-Mark Super Hand Vise #85139) is a small parts vise that has proven to be quite helpful for harp tech work.

Here is a terrific application for the Super Hand Vise--securing reed pads for drilling.

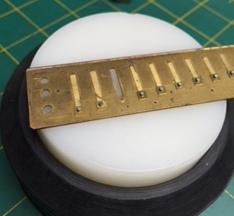
Using a brass Tool Maker’s Mallet (Micro-Mark #81523) is a perfect tool for surgically flattening harmonica reeds. Notice the Combo Bench Block anvil (Micro-Mark #85779)
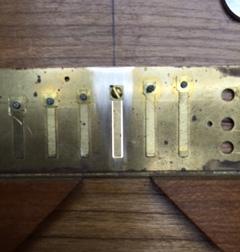
After attaching the replacement reed to the reed plate, use a background light source to perfectly align the reed clearance within the slot. If not, the reed will click and clack against the walls of the reed plate slot and drive you mad, right?

Notice how tight and flat the reed pad lies onto the reed plate. Remember, everything must be FLAT!
Your Harpsmith, Kinya
Kinya thank you for taking so much time to post such a fully developed response bit will be very helpful in the future.
Actually my particular problem turned out to related to the replae reed being too wide for the slot. Therefore the reed could not vibrate freely in the slot. A friend of mine diagnosed this and helped me fix it by ...gasp...enlarging the slot with a file. The reed is sounding now and just needed a little tuning. I don't know if enlarging slots is common but I find that new replacement reeds from Hohner tend to be wider than the reeds originally found in the harp.
Hi Paul, I'm glad you are up and running.
Over the years, I have worked on thousands of reed slots--and never once had to enlarge the reed slot with a file. I did--one time, trim the width of a reed to fit the slot.
I'm thinking now, either your reed slot was excessively embossed (sized down too much), and/or you accidently chose the incorrect donor reed.
I can not stress enough, the importance of aligning the reed with the aid of a light source (even if that means holding it up to the kitchen light ;o). You want to see an even "sliver of light" that will surround the sides and tip of the reed (see photo #13).
Your Harpsmith, Kinya
Yes, I figured I was doing something I shouldn't.
I am holding the reed plate up to the light to check the reed alignment. the problem is that the hole in the reed doesn't seem to be centered (see my first post) so it is impossible to get the reed aligned properly.
To follow up on your advice;
1. how did you trim the reed?
2. I'm going to get the tapered reamer that HarpWrench recommended above. Unfortunately, Hohner only offers it in their $400 kit. No thank you.
Rejoice my friend. You have two choices:
- MicroMark offers a set of micro-sized reamers (#26108) for only $23.55 Simply, enlarge the hole on the rivet pad--enough so that you create enough play to "push" the reed over to center of the slot ;o)
- Use a small rat tail jewler's file (#33108) from the 12-piece Swiss Pattern set, for only $10.70, then "slot" (read:oval) the reed pad hole.
<www.MicroMark.com>
HINT: I find installing a 0-80 washer between the head of the 0-80 maching screw and reed pad helps with this surgical process.
Your Harpsmith, Kinya
Kinya...the S word this time...success.
So I was convinced that the saran wrap on a comb sound I was getting on the replaced reeds was the reed not floating freely in the slot, but instead getting hung up on one edge of the slot or the other. I didn't get the tapered reamer, but I did improve my technique for drilling the hole in the reed pad so that it was centered. I did this by not going right to the clearance drill bit at first. Instead, I started with the tapping drill bit to start the hole. I then graduated to the clearance bit. This was an improvement.
The big difference came however when I noticed the replacement reeds, that I bought new from Hohner, were not all the same width. Some are wider than others and the wider ones don't float freely and don't sound. When I put in a reed that looked visibly more narrow, the reed plinked and sounded clearly.
The next issue was the replaced reed, was a full 50 cents flat. I don't think there's anything I could be doing in the reed replacement process to cause this, do you? Any rate, I watched your tuning video ago and ran to the hardware store for a chisel. After a few minutes I learned to use it and got that sucker in tune. It's as good as new.
Yes, you were right. This is a journey. I'm psyched now because I have about five more haprs to fix and I'm sure I can do it. Thanks again.
Marverlous!
Your Harpsmith, Kinya
Kinya, I have to update this to thank you and the other contributers for recommending the tapered reamer. I broke down and bought a set and that is the missing link in this saga. It took me about five minutes to enlarge the hole in the reed pad, center the reed, screw it down and voila, a good as new harmonica. No BS.
A message to beginners... You can do this!!!
Spread the message far and wide ... reamers can bring joy to every girl and boy ;o)
Your Harpsmith, Kinya

On the Sleigh tool there should be 4 slots with a hole at the end on the top of the tool. The reed fits in the slot so you can support the reed and keep it from twisting when enlarging the hole on the reeds. I was having a heck of a time holding Ssydel reeds when reaming. My fingers would get sore. So I made a shallow slot with a square end for the rivet pad with a hole in the end of the slot in a piece of wood. I'd press the reed tight and the slot would stop it from spinning making it very easy to ream the whole. Richard liked the idea so much he mase one in aluminum. From there it made it to the top of the anvil. Watch Richard demonstrate the anvil at hotrodharmonicas.com. Ir's easier to understand when shown than reading about it.
Thanx Jon!
~ Kinya

A tapered reamer works better than a drill, you can get them from Seydel or Hohner. A drill bit doesn't really leave a round hole.