How to solder a Switchcraft 2501 MP?
Sat, 11/19/2016 - 04:43
Hi I wanna know how to install a Switchcraft 2501 MP in to a mic shell. The first part I think i can do, but the soldering part I have no clue?! Is there any instructions on how to do this on the webb? Or a book with pictures on how to solder a Switchcraft 2501 MP?
Thanks / Jonathan A


Hi, Jonathan
Believe me, soldering is the easy part. I have thousands of screw-on connectors - so I certainly have some opinions! Installing the connector depends on the shell. The Shure bullets can be drilled and tapped, and the connector can be screwed in. To thread the shell you need an “R” drill bit and a 3/8-32 tap. You won't find either at most hardware stores. When you drill out the cable hole, even if you step up with every drill size in between, the drill bit wants to grab the shell (because the shell is made out of cast zinc, which is almost as soft as lead) and so it wants to rip it out of your hands or a poor work holding system and "helicopter". This is dangerous! If you don't have a way to hold the shell securely, DON'T DO IT. It is very difficult to start a tap straight in this material - again - you need a really good system to hold the shell AND the tap exactly perpendicular to each other. You ALSO need a way to securely hold the connector in order to tighten it when you install it, without damaging its threads. Hand tight is not good enough. I use a tool called a collet chuck for this. A screw-on connector has a knurled portion above the threads. Unless you want that to show, you'll need to find a way to remove it to a depth that allows the connector to screw all the way in, without going too far and reducing the wall thickness too much which will weaken the connector.
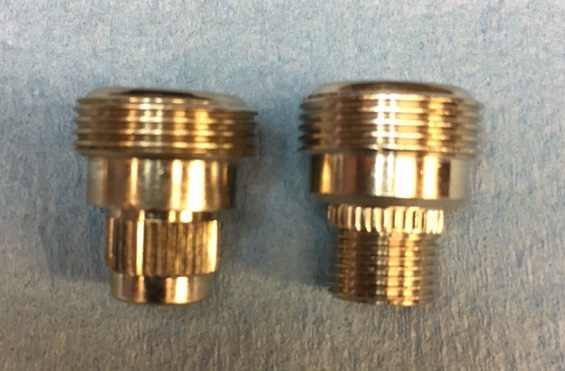
The connector/cable exit hole in Astatic mics, however, is a little too big to drill and tap. It is sized for press-fitting a connector. The connector the factory used had elongated splines compared to the current Switchcraft part (see photo below), and without a special jig to support the shell, you can't press one in anyway - so pressing is out. If you tap the existing hole, the connector threads will screw in, but only at about 25% engagement, which is way too loose. I repair mics all te time that were done this way. People try to secure the connection with Loctite, epoxy, set screws.... NONE of them last well. ALL of these will end up with a failed/intermittent ground connection. (The connection between the connector and the shell IS the ground connection for your signal in most cases.) See photo below of a connector installed this way that I removed from a JT30.
So for an Astatic shell, the only good solution is to bore the hole out further, then machine a bushing to press-fit into that hole, and internally thread the bushing for the connector. I do that job but it takes a lathe, a milling machine, some special tooling and the skill to use it all. For other shells - it depends. Some shells are thin enough to install the connector through the hole and get the nut and solder lug on the back side of it. But if the shell is thin enough that the splined area protrudes into the shell, you can't get the nut tight without adding some form of spacer. More importantly the inside of the shell is round. You can't get a nut to sit down inside a round area and tighten well....In other words - proper installation in a shell might not be as easy as you thought! How to solder? Soldering is easy. Solder is simply a metal with a low melting temperature. It also has a compound (called "rosin" or "flux") that helps avoid oxidation during the process, and helps the solder flow. You simply need to heat both parts to that melting temperature and add a little solder, then hold them in position until the solder cools. Pros know that you should always "tin" wires - that is, melt some solder onto them before joining them to each other or another part. If you tin BOTH parts and have a little solder on the soldering iron tip, you don't have to add solder when you joint the parts. That can be handy because often you don't have enough hands to hold both pieces in position AND hold the soldering iron AND hold the solder.FYI - I charge $35 to install a screw-on connector in a Shure shell or any other shell that can be properly drilled and tapped. When fabrication is required such as for an Astatic shell, I charge $55. I hope that answers your question!