Hohner 64 Chromatica comb replacement

I was given A Hohner 64 Chromatica. The comb is a plastic, maybe bakelite. The comb is broken where the screw holding the slide enters the trapped nut (both sides) The reed plates are attached to the comb with nails that go through both reed plates. I want to change the comb. How do I get those nails out without ruining the reed plates? How do I attach the reed plates to the new plastic comb?
I watched your videos, but the nail removal task on the chromatica is more difficult. There are 15 nails. 9 are driven through the top plate. They pass through the comb and the bottom plate and the nail points protrude slightly beyond the bottom plate. Similarly, for 6 nails driven through the bottom plate and points protruding through the top plate. I have removed two nails by driving the points flat with the plate through which they protrude. This opens a bit of space on the head end, and I can get a grip on the head. However, the nails are extremely tight everywhere. When I try to pull on the head to extract it, it is so tight in the plate that the plate is under extreme stress and I'm afraid I will distort the plate. Maybe I can rig up some sort of clamping mechanism to that when I pull on the nail, I am not lso pulling on the plate.
It is apparent that when the holes for the nails were drilled originally, they were drilled slightly smaller than the diameter of the nails. When the nails were driven in they became very tight.

Hey Bill, on Golden Melody harmonicas, I have been successful positioning steel tubing--just oversized enough to clear the nail heads.
Next I flip the harmonica upside down so the tube is flat against my workbench surface
Next with my small ballpean hammer, I slam the exposed pointed end of the nail downward.
Next removing the steel tube, I exposed the head of the nail and found it moved off the reed plate enough to grab the head with my pliers (needle nose vise grips sometimes).
There is no reason you can't do this with your beast.
p.s. the reed plate is about 1mm thick and pretty hardy. I wouldn't worry about warping
Your Harpsmith, Kinya
Hello Bill, I checked my Hohner collection and found this new-old-stock Chrometta 12 (designed by the same artist who created the Golden Melody harmonica). For sake of instructions it will serve our purpose:
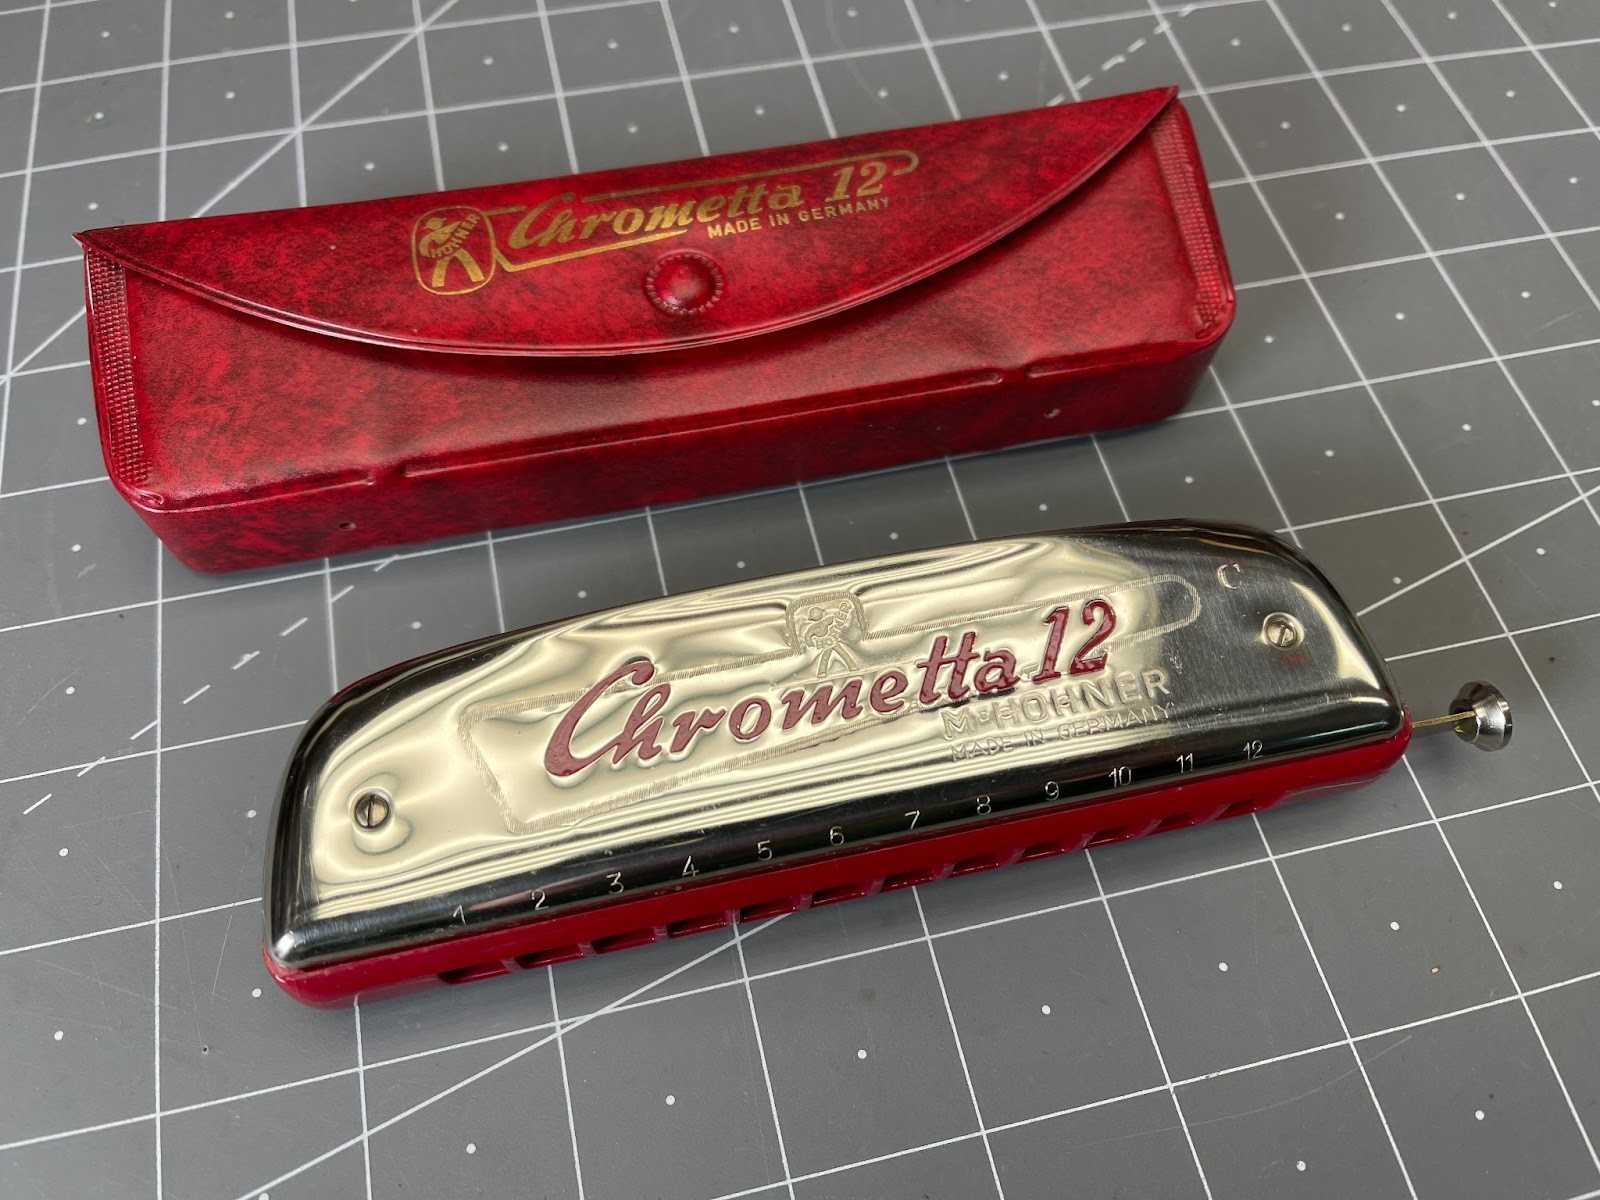
Looks better than it plays
Crossed tuned layout
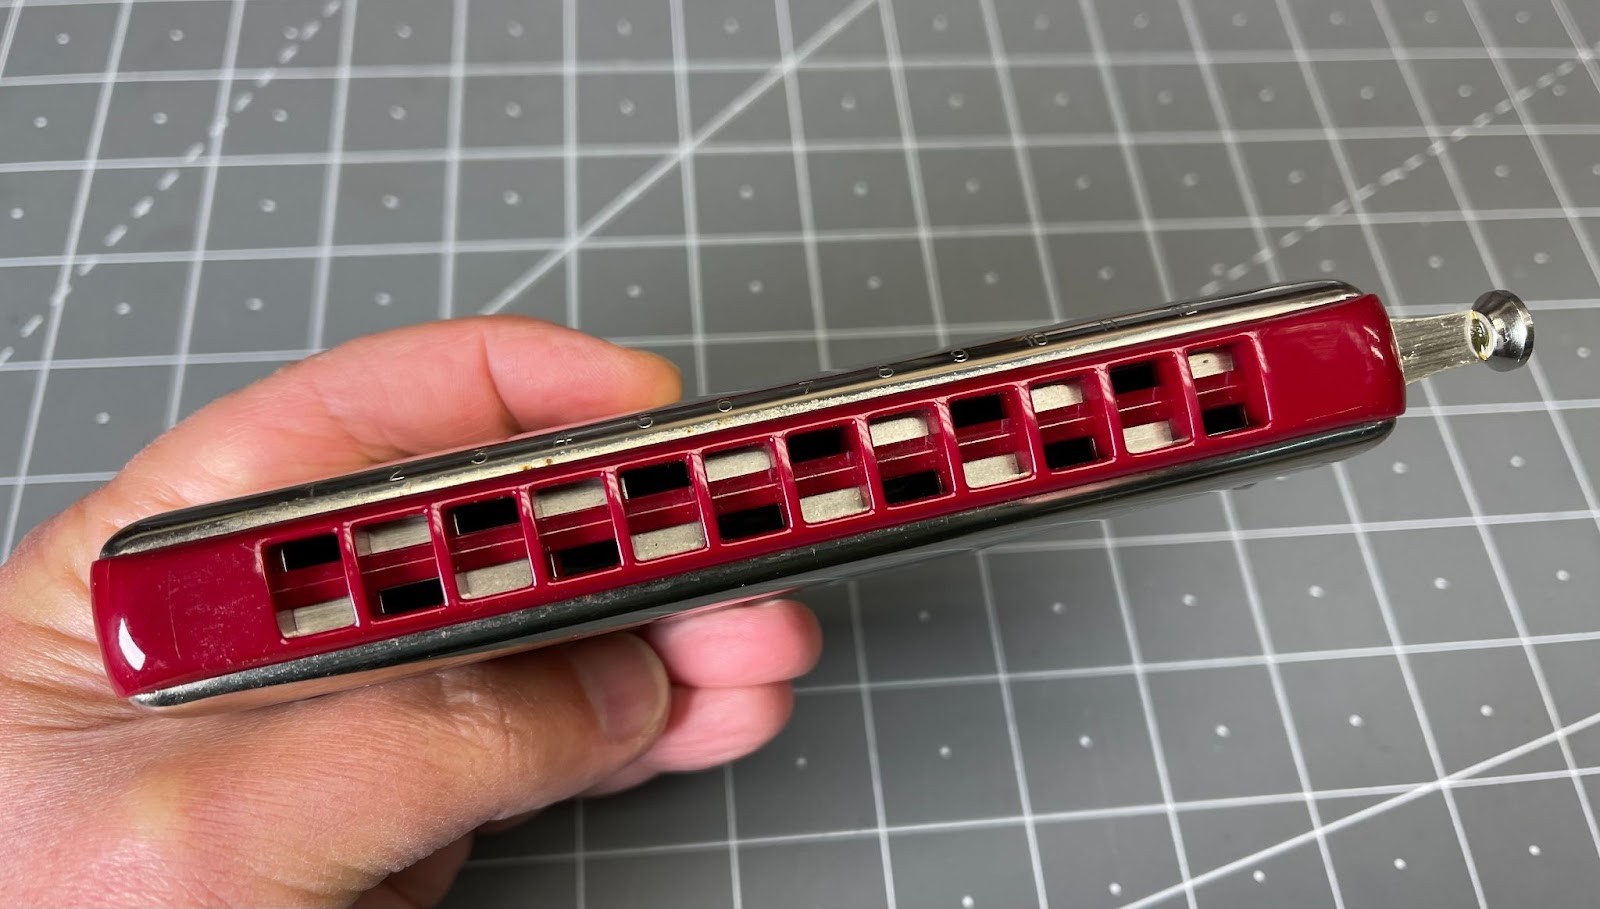
Seated nail head
View of pointed end of nail
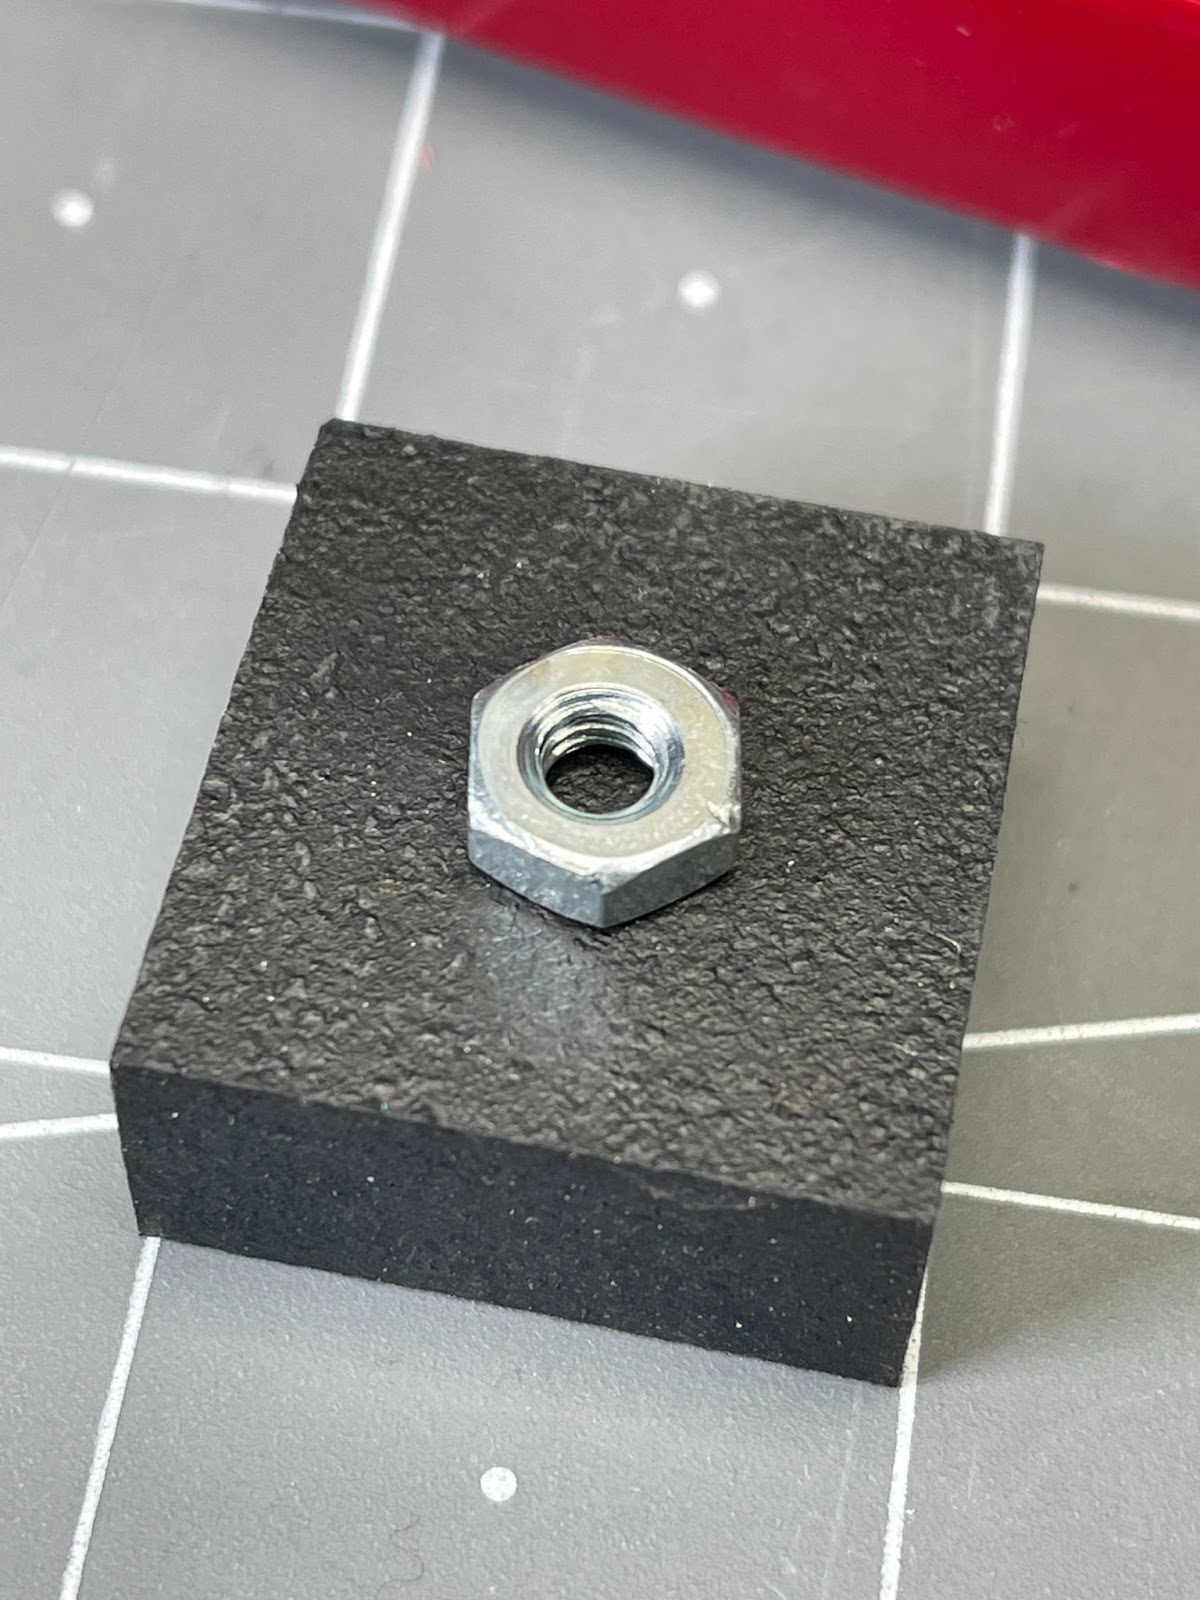
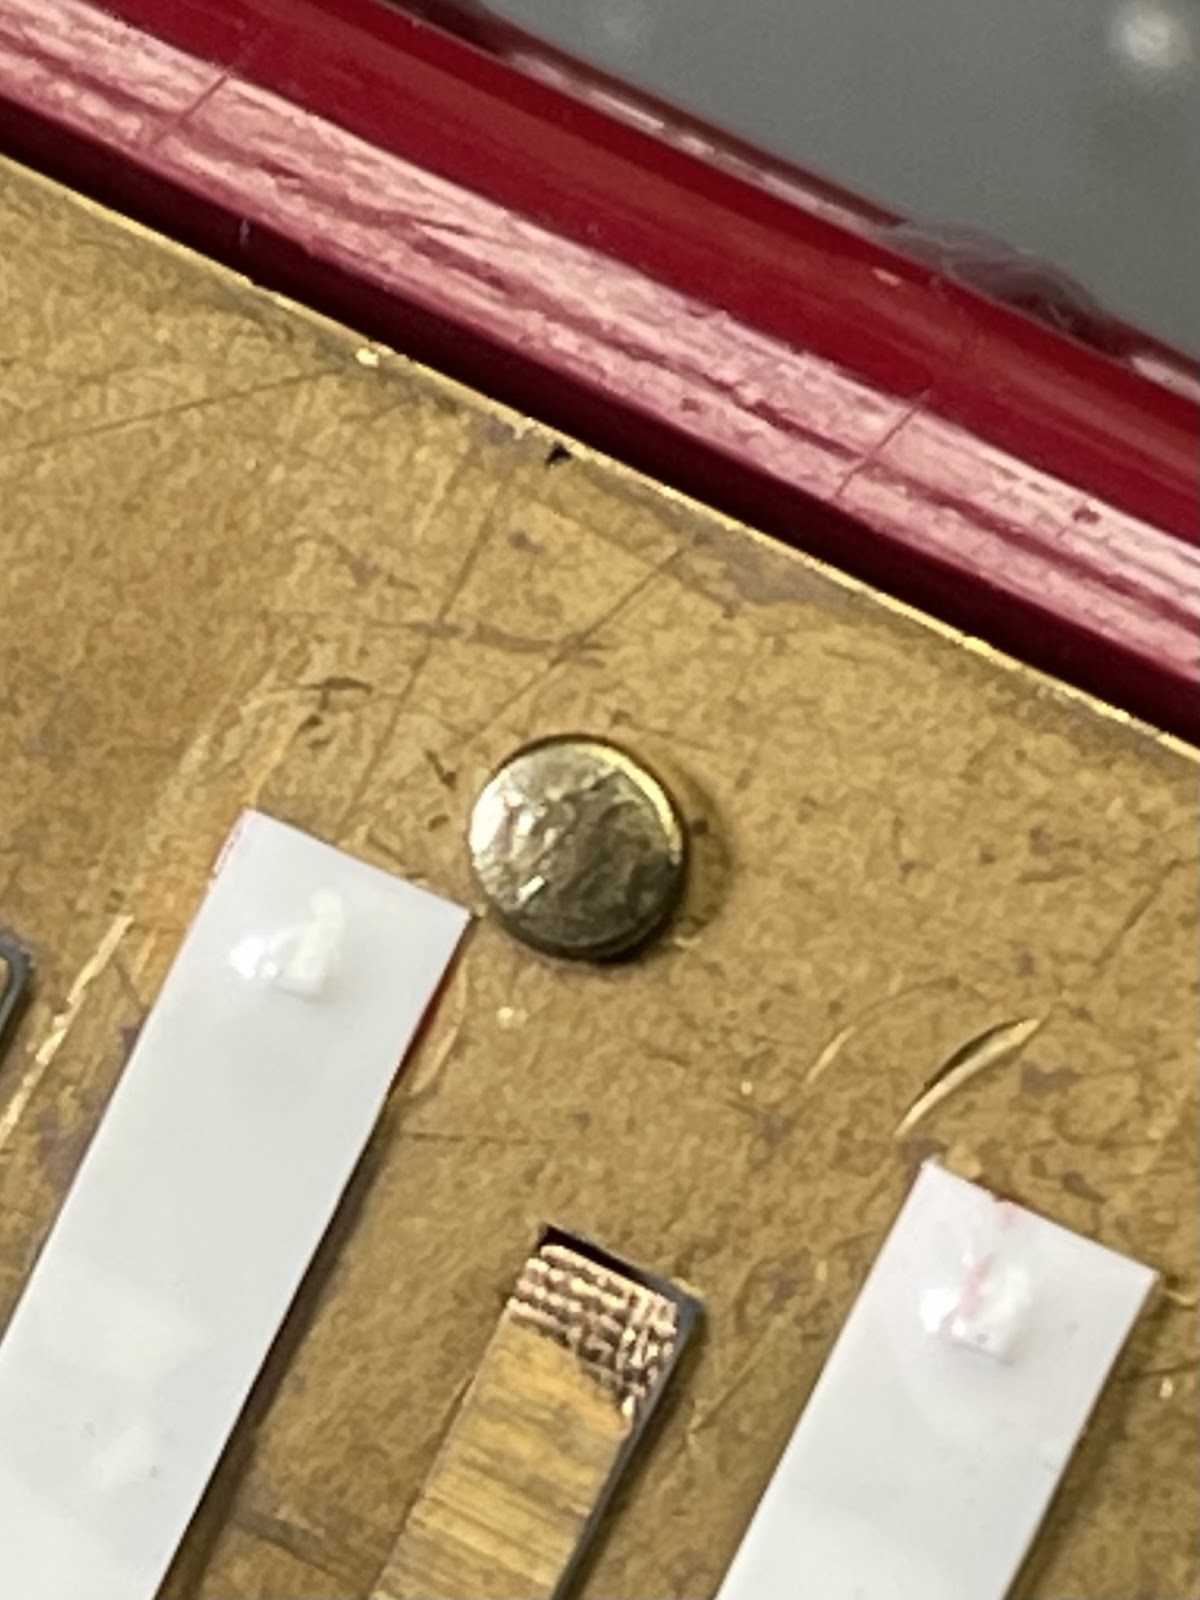
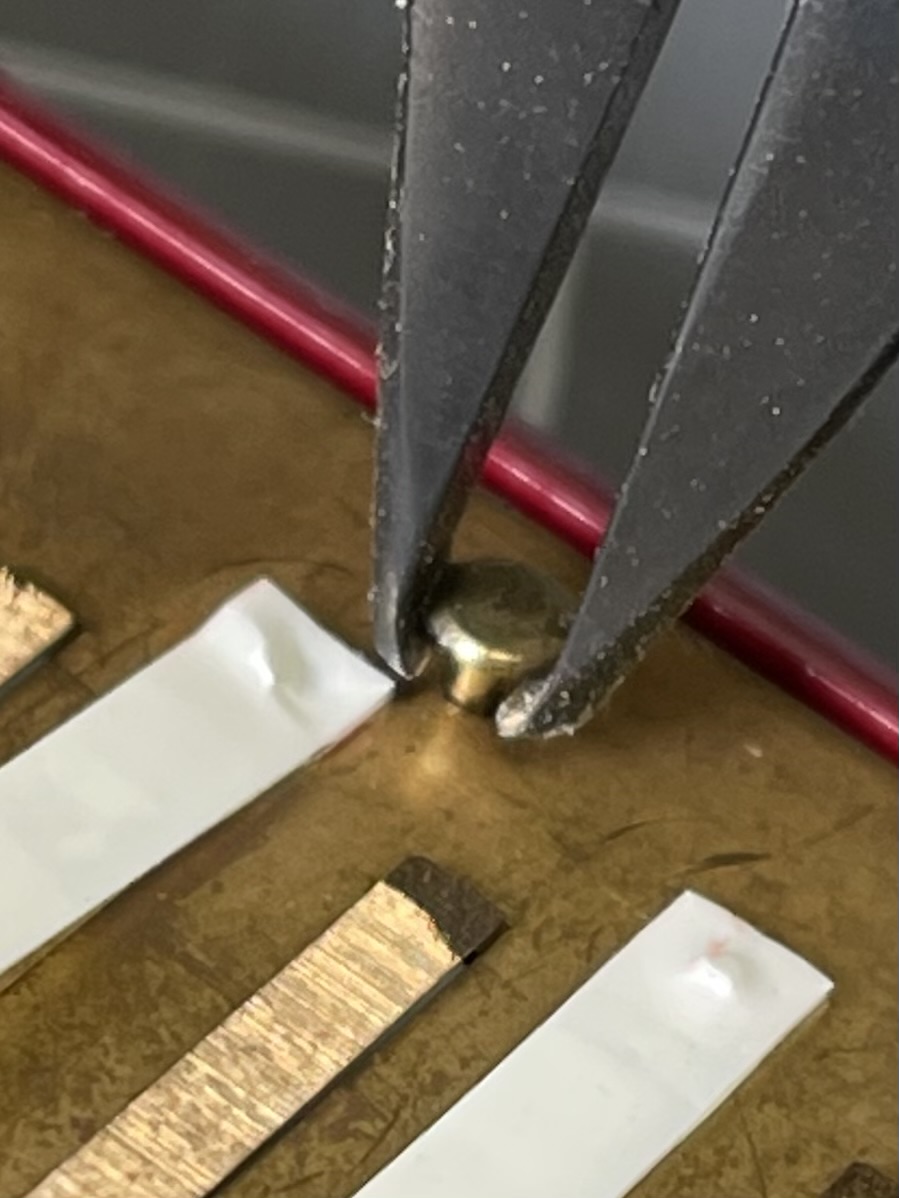
I selected a small 8-32 machine screw nut for my “anvil”

Position the 8-32 machine screw nut over the head of the nail
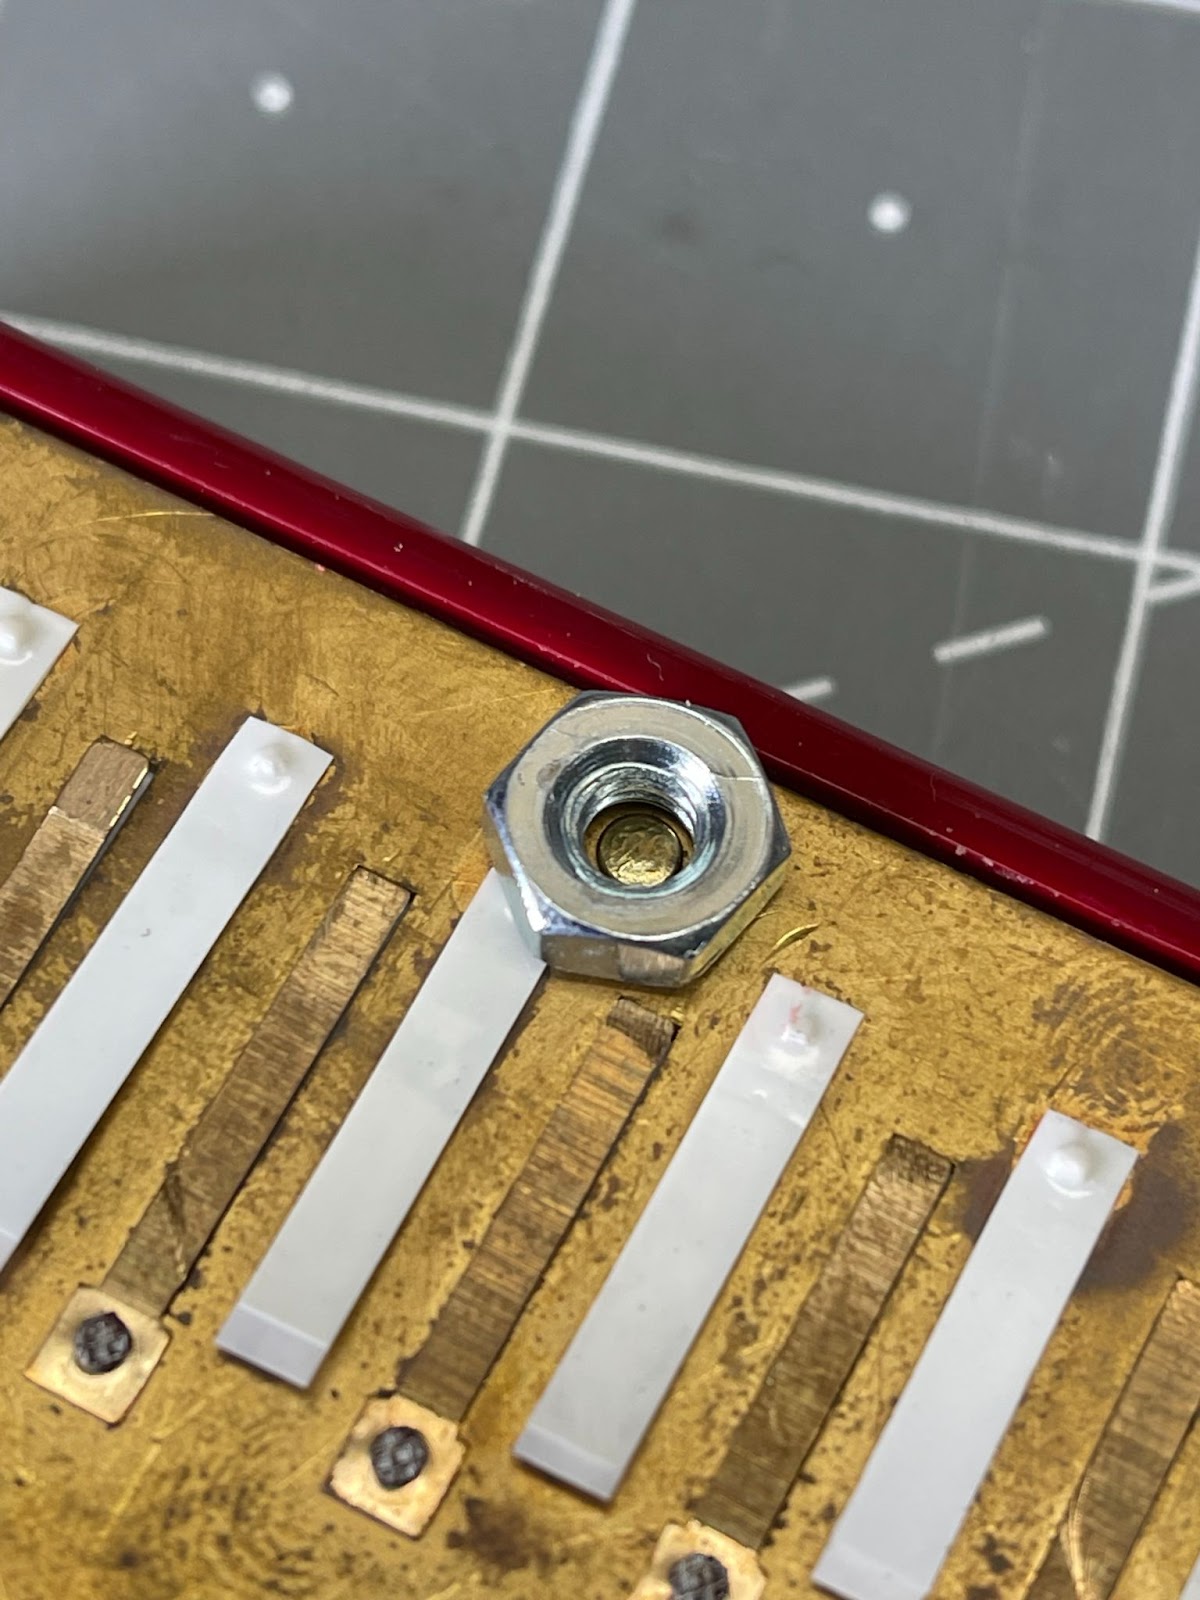
Center nut over the head of the nail. Note: if you plan to keep the windsavers use a smaller outside diameter nut (or washer) to stay clear of the windsaver pad

Use a strip of 3M Painter’s Blue Tape to temporarily hold nut in place
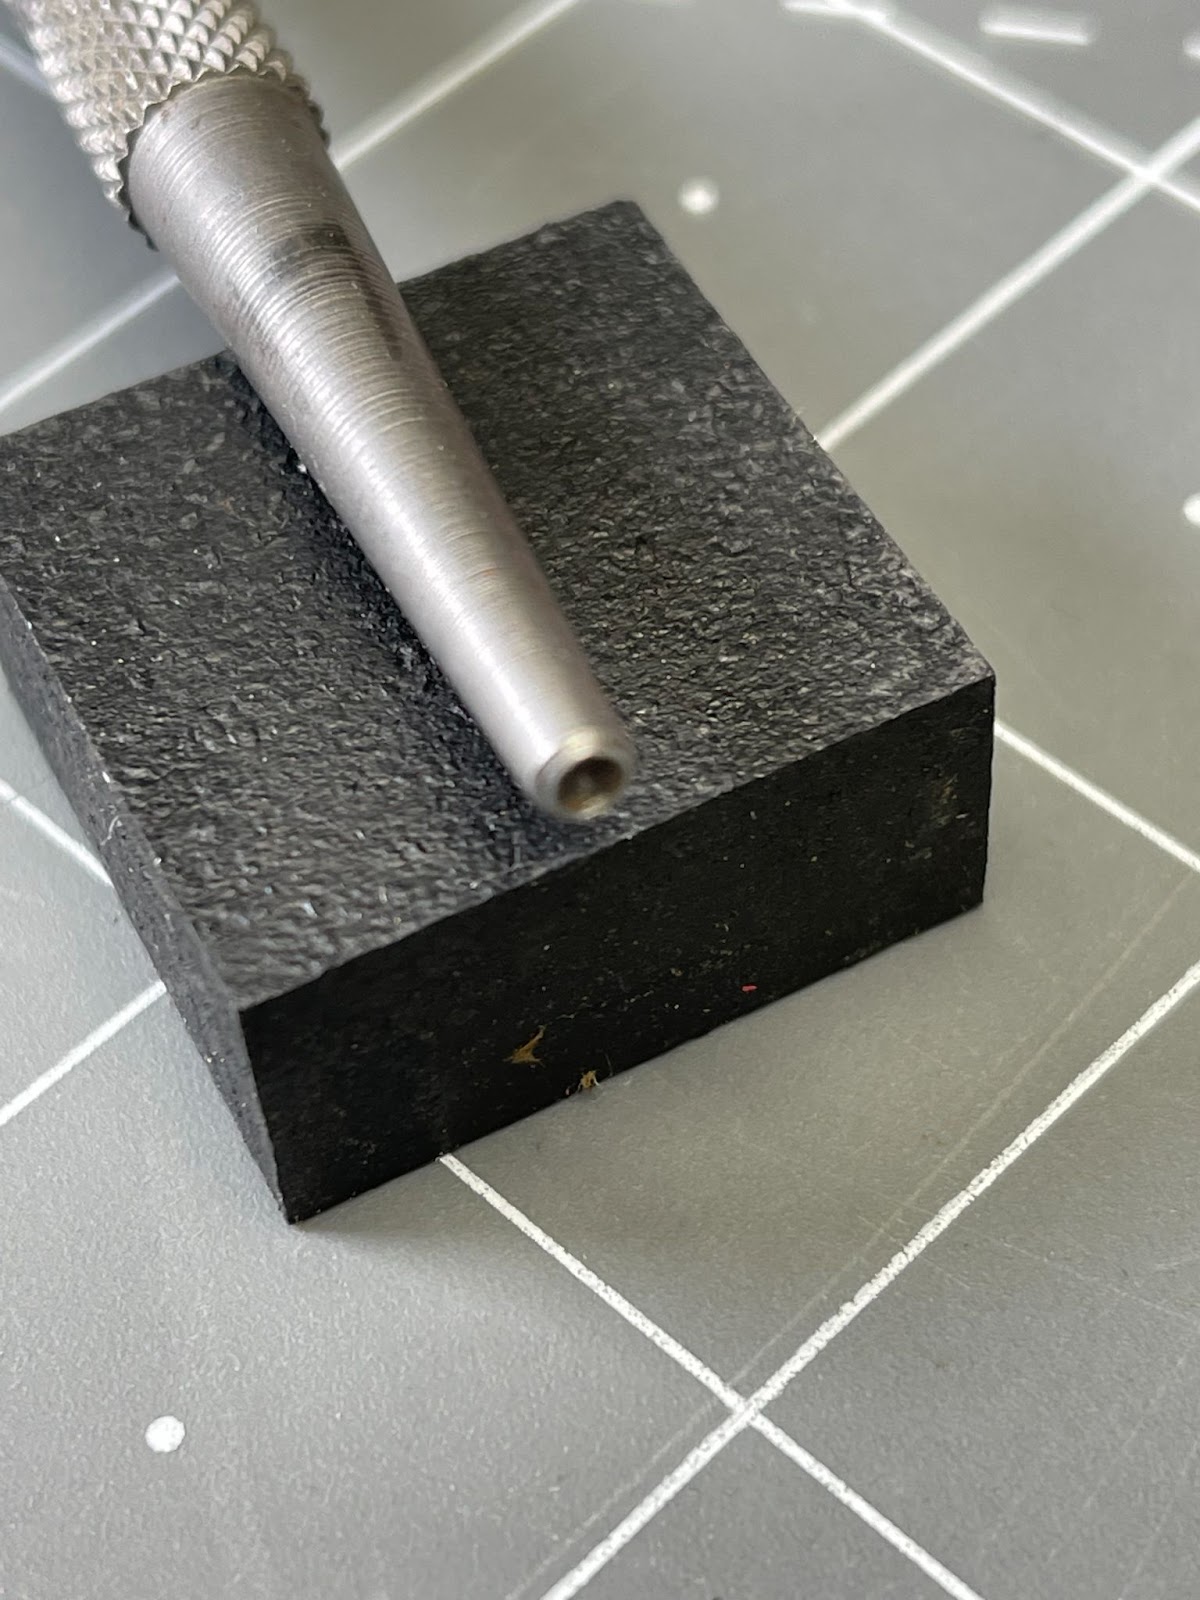
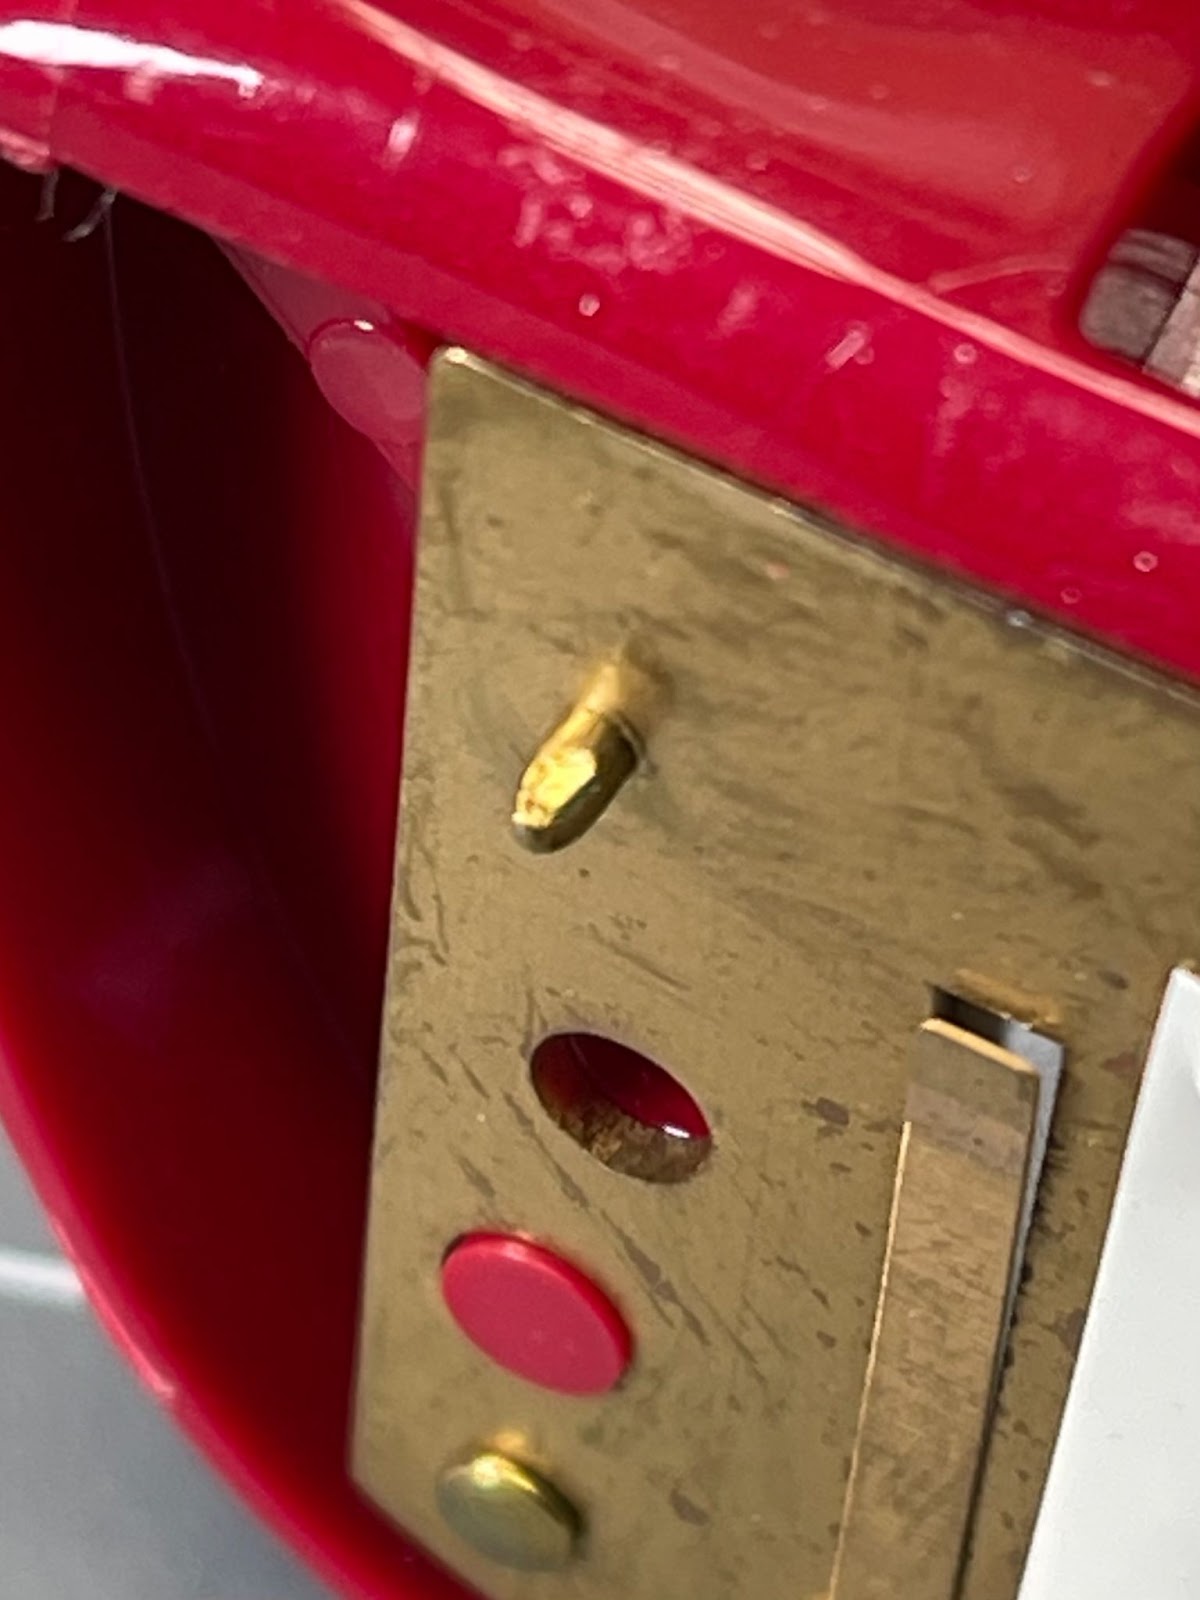
Cabinet Maker’s “nail set”
After flipping over the harmonica, position the nail set tool directly over the pointed end of the nail and give a couple of whacks with a small ball peen hammer

The nail head lifts off the reed plate. Notice the mangled windsaver pad (oops)
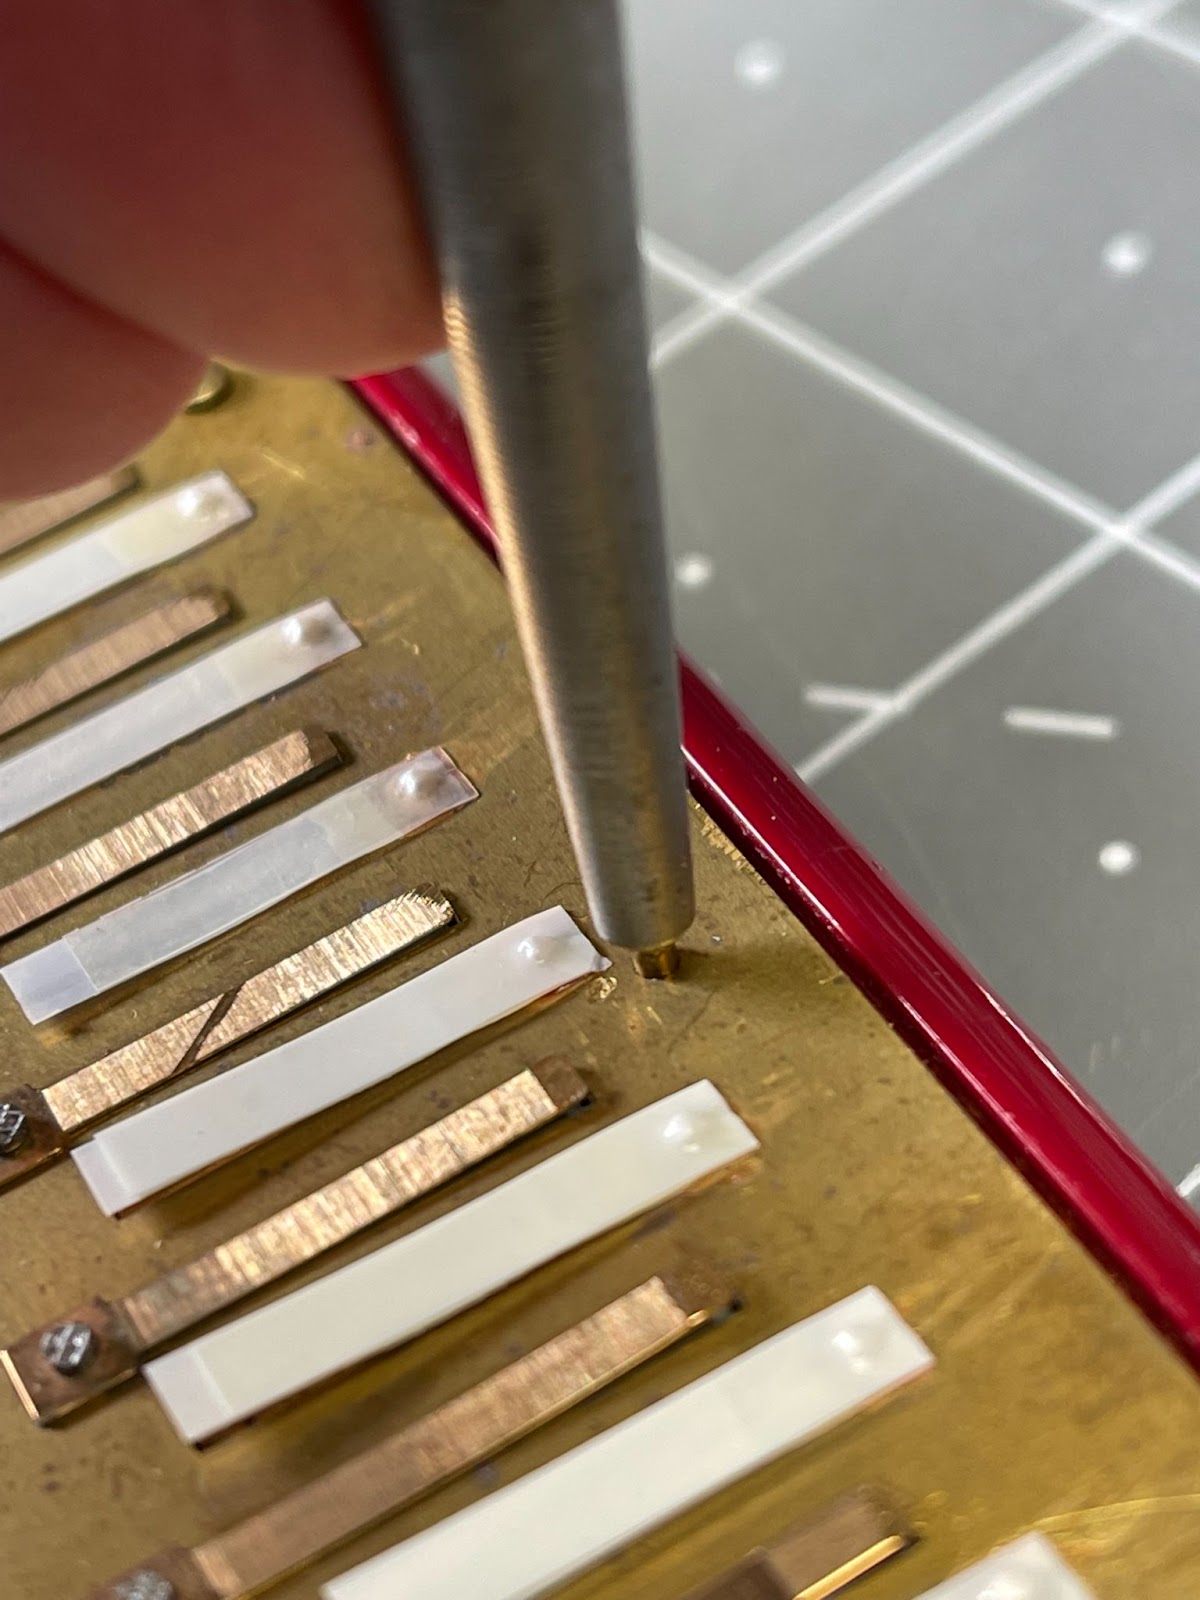
Use narrow nipper pliers to twist and pull the nail out. Voila!
Now you try it.
Your Harpsmith, Kinya
Great photos. Thanks. I just suceeded in removing all the nails. I found a brass fitting (I presume a gas fitting) with a nut on one end and a tube extending about 1 1/2 inches, with an opening in the tube of about 1/8 inch. I put that in my vise, tube up. Placing the nail heads facing into the tube (i.e. down) I could tap the nail heads until they were flat and the heads were then protruding.
But the nails were very tight and I was still afraid bending the reed plates. I used a narrow-nosed vice grip to clamp the reed plates to the comb, then grabbed the heads with a wire cutter and slowly wiggled them out. I could use the vice grip as a fulcrum so that I could put only upward pressure on the nails.
I had covered the reeds and wind savers with card stock paper and tape so I could handle them without damage AND all of my wind savers survived.
The nails are .054 inches in diameter. I presume that 1/16 self tapping screws (i.e. .063 inches) will tap into that just fine.
Thanks for your help. Cheers, Bill
Well done Sir!
I have not used 1/16" self tappers in my Harp Tech work... I'm thinking with that .063" hole left behind by the nail, using 2-56 machine screws might be a tad too small in diameter and require a nut. Possibly a 4-40 tap and machine screw would work well.
Don't forget to send us photos.
Your Harpsmith, Kinya
I'm not much as a photographer, but here we go. This brass fitting easily fit in my vise, small open end up. Notice the rigid foam to gently support the reed plate while I worked on it. I put the reed plate with the nail heads facing down into the hole in t
he fitting, then tapped the points of the nails with a small ball peen hammer.
The nail heads now protrude about 1/16". I used a narrow nosed vice grip to clamp the reed plates to the old comb. The nails were very tight, but I could grip them with a wire cutter and pull them straight out, sometimes using the vice grip as a fulcrum.
The nails are .054" in diameter. Since they fit very tightly in the holes I presume the holes are also .054". I have some Hohner screws that are .063" (i.e. 1/16) so I plan to have them go through the top plate and self tap into the bottom plate. I've tested the self tapping idea and that seems to work fine. So that the screws pass easily through the top plate I enlarged the holes in the top plate to .075 (i.e. 5/64) using my small jewlers' drill press.
I'll let you know how it is when I get it all together.
Cheers,
Bill
I hope the harp comes out better than these photos.
Hi Bill, it can be challenging to post photos onto this site. My "go-to" solution is to create a Google Doc on the Microsoft PC platform;
- Include your narrative and (properly sized) photos
- "Select ALL" (or Control A)
- "Copy" (or Control C)
- "Paste" your content directly onto this Forum
Give it a try
Your Harpsmith, Kinya
The harp came out well. The 1/16 screws self-tapped into the .054" holes left by the nails and it all tightened up as expected. I get no sound out of the very lowest 1 hole draw, but other than that everything works OK It's a beast to play.
Congratulations Bill!
What replacement comb did you use?
Regarding the stuborn #1 Draw reed:
- Inspect the gapping and make certain during construction you did not accidently push the reed into the reed plate slot
- Examine the windsaver, maybe it popped off? Maybe it is stuck to the reed plate and closed off air passage?
- Maybe during assembly the reed plate warped and created an unintended air passage for the air to escape, creating loss of compression?
- Remove the cover plate and hold up the instrument to the light and look for any sliver of light between the comb and reed plate. This will cause heartache for you.
Let's investigate!
Your HARPSMITH, Kinya
Hi Bill, don't forget to check the alignment (axis) of the #1 Draw reed within the slot. Does it "plink" freely?
Your HARPSMITH, Kinya
Yep! The reed was stuck in its slot, a wee bit off center. It works ok now. Maybe if I get used to playing this I'll change out all the windsavers. They seem to work, but they are probably the originals.
Thanks for your tips.

This sort of thing is well beyond my "out of the box" pay grade, but I'm really enjoying following Bill's progress and Kinya's guidance. Thanks guys!
Hey Bill, good to hear from you!
Your HARPSMITH, Kinya

Howdy Bill, retrofitting the legacy HOHNER 64 Chromatica will be a cool and challenging project!
The comb is made of Bakelite (similar to the combs on Golden Melody), terrific for applications requiring chemically resistant properties, but super brittle and a real pain for Harp Techs. I hope your replacement comb is made of harmonica friendly materials.
I would recommend you review Marine Band University, Episodes #10A and #10B. Here I demonstrate unique tools and techniques for removing nails and replace with threaded machine screws. NOTE: your replacement threaded (reed plate) machine screws must be longer for the Chromatica.
https://www.bluesharmonica.com/harpsmith_bench
Let's stay in touch for this project!
Your Harpsmith, Kinya